Appearance
0. 前言
MuJoCo 官方的手册里大部分内容是面向开发者和程序员编写的,对于初次阅读的用户来说,很容易迷失在一大堆计算机专业术语中。
本入门操作手册,旨在为刚接触机器人仿真的用户提供一个较为清晰的脉络,只保留了一些必要的基础知识,尽量简化了学习路径,去除了大量与实操无关的编程细节。
MuJoCo的优势:MIT License、多平台兼容、Python库友好、可扩展性高
1. 快速开始(可执行文件)
打开mujoco官方github仓库,下载release版本,运行simulate可执行文件,拖入example文件夹里的xml文件,即可看到机器人的运行效果。
或者命令行中运行如下命令
bash
./bin/simulate ./model/humanoid/humanoid.xml仿真界面介绍

- joints
- control
- option
- simulation
- physics
- rendering
仿真参数介绍
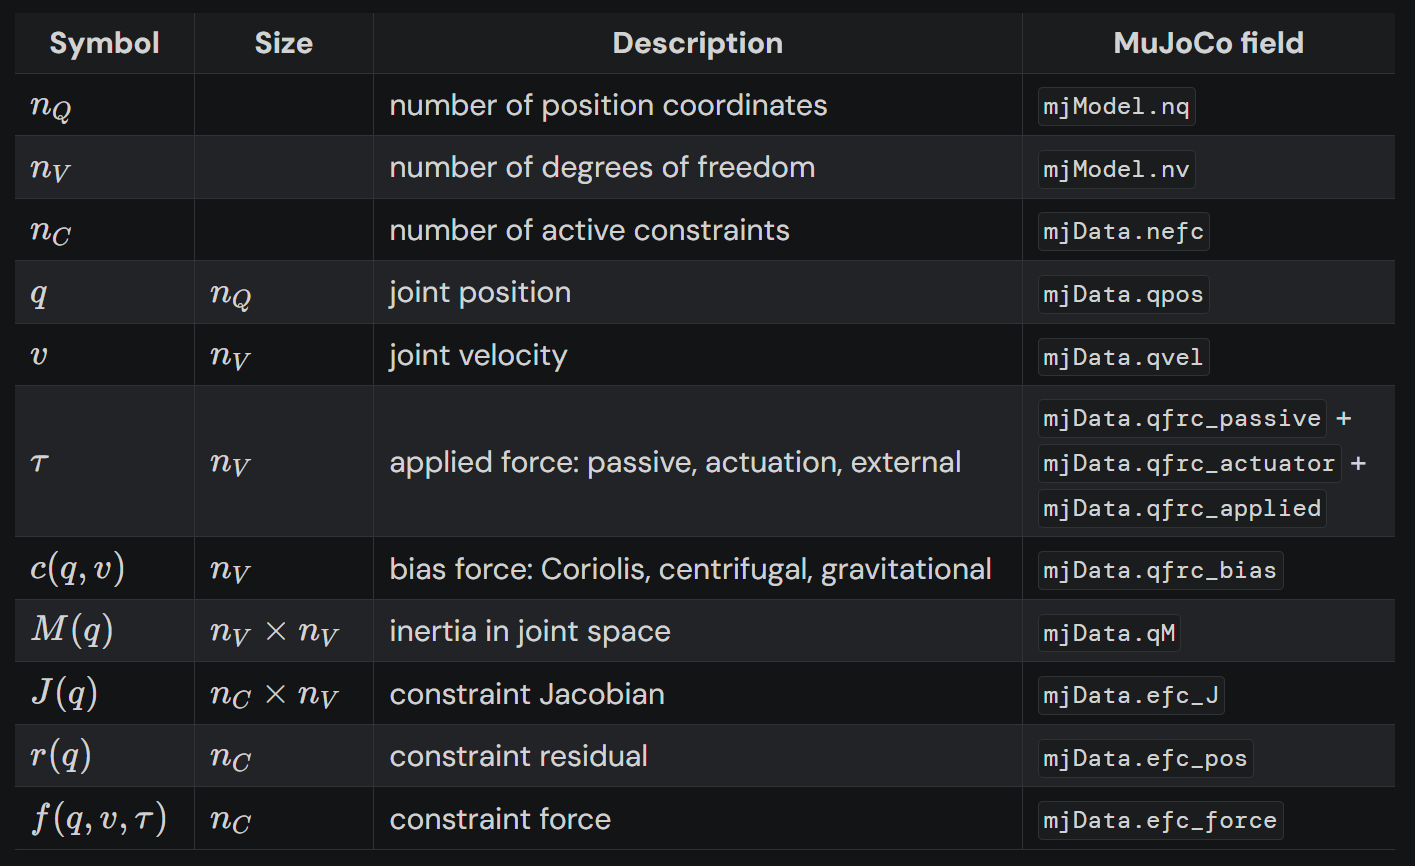
在MuJoCo中,最重要的两个数据就是mjModel和mjDate,为了方便后续理解,我们首先再次给出如下的参考表格。
2. 建模
MJCF文件结构
小车倒立摆(基于mujoco自带的模型定义)
(~/ws/robosim/script/cartpole)
-option -asset -worldbody -body (name pos quat euler mocap ...) -joint (type axis damping) -geom (type size material contype conaffinity) -site (name pos quat euler) -freejoint (name)
xml
<mujoco>

  <option timestep="0.001" gravity="0 0 -9.81"/>
  <option solver="Newton"/>  <!-- 使用更精确的牛顿迭代法 -->

  <asset>
    <texture name="grid" type="2d" builtin="checker" width="512" height="512" rgb1=".1 .2 .3" rgb2=".2 .3 .4"/>
    <material name="grid" texture="grid" texrepeat="1 1" texuniform="true" reflectance=".2"/>
  </asset>


  <worldbody>
    <!-- 地面 -->
    <geom name="floor" size="0 0 .05" pos="0 0 -.7" type="plane" material="grid" condim="3"/>

    <!-- 小车(可水平移动) -->
    <body name="cart" pos="0 0 0" euler="0 0 0">
      <joint name="slider" type="slide" axis="1 0 0" pos="0 0 0" damping="0.1" limited="true" range="-10 10"/>
      <geom name="cart_geom" mass="2" type="box" size="0.2 0.1 0.1" rgba="0.7 0.3 0.3 1"/>

      <!-- 摆杆 -->
      <body name="pendulum" pos="0 .15 .4"><!-- pos确定body相对parent坐标的位置 -->
          <joint name="hinge" type="hinge" axis="0 1 0" pos="0 0 -.3" damping=".1"/><!-- pos确定joint相对自身坐标的位置 -->
          <geom name="pendulum_geom" mass="1" type="cylinder" size="0.02 .3" pos="0 0 0" rgba="0.3 0.7 0.3 1"/><!-- pos确定geom相对自身坐标的位置 -->
      </body>
    </body>
  </worldbody>

  <!-- 执行器(控制小车的力) -->
  <actuator>
      <!-- 定义一个电机驱动的执行器 -->
      <motor name="cart_motor" joint="slider" gear="1" ctrllimited="true" ctrlrange="-100 100">
      </motor>
  </actuator>

  <sensor>
    <!-- 定义一个名为"cart_pos"的传感器,用于测量小车的位置 -->
    <jointpos name="cart_pos" joint="slider"/>
    <jointvel name="cart_vel" joint="slider"/>
    <!-- 定义一个名为"pendulum_angle"的传感器,用于测量摆杆的旋转角度 -->
    <jointpos name="pendulum_angle" joint="hinge"/>
    <jointvel name="pendulum_vel" joint="hinge"/>
  </sensor>

  <keyframe>
    <key name="off1" qpos="0 1"/>
  </keyframe>
</mujoco>
导入自定义assets (六轴机械臂)
xml
<mujoco model="arm">
	<compiler angle="radian" autolimits="true" />
    <option timestep="0.001" gravity="0 0 -9.81" solver="Newton"/>
    <!--option cone="elliptic" impratio="100" /-->
    <asset>
        <!-- sky light and ground -->
        <texture type="skybox" builtin="gradient" rgb1="0.3 0.5 0.7" rgb2="0 0 0" width="512" height="3072"/>
        <texture type="2d" name="groundplane" builtin="checker" mark="edge" rgb1="0.2 0.3 0.4" rgb2="0.1 0.2 0.3" markrgb="0.8 0.8 0.8" width="300" height="300"/>
        <material name="groundplane" texture="groundplane" texuniform="true" texrepeat="5 5" reflectance="0.2"/>
        <material name="metal" rgba=".2 .2 .2 1" />


        <mesh file="asset/link1.STL" />
        <mesh file="asset/link2.STL" />
        <mesh file="asset/link3.STL" />
        <mesh file="asset/link4.STL" />
        <mesh file="asset/link5.STL" />
        <mesh file="asset/link6.STL" />
        <mesh file="asset/4340P.STL" />

    </asset>

    <worldbody>
        <light name="top" pos="0 0 2" mode="trackcom"/>


        <body name="L0" pos="0 0 1" quat = "1 0 0 0">
            <inertial mass="0.381" pos="0 0 -0.073681" diaginertia="0.000172771 0.000172156 0.000152693"/>
            <geom type="mesh" mesh="4340P" pos="0 0 0" quat="1 0 0 0" material="metal"/>

            <body name="L1" pos="0 0 0" quat = "1 0 0 0">
                <inertial mass="0.508" pos="0.000093 0.004299 -0.003571" diaginertia="0.000382429 0.000280812 0.000333462"/>
                <geom type="mesh" mesh="link1" pos="0 0 0" quat="1 0 0 0" material="metal"/>
                <joint name="JL1" axis="0 0 1" damping="1" limited="true" range="-1.7 1.7"/>

                <body name="L2" pos="0 0 0" quat = ".5 -.5 -.5 -.5">
                    <inertial mass="0.76058" pos="0.227057 0.000029 0.00438" diaginertia="0.000632066 0.010462832 0.010251208"/>
                    <geom type="mesh" mesh="link2" pos="0 0 0" quat="1 0 0 0" material="metal"/>
                    <joint name="JL2" axis="0 0 1" damping="1" limited="true" range="-1.7 1.7"/>


                    <body name="L3" pos="0.3055 0 0" quat = "1 0 0 0">
                        <inertial mass="0.4622032" pos="0.0595721 0.0038498 0.0057896" diaginertia="0.0003683707324 0.0006021038701 0.0004574704886"/>
                        <geom type="mesh" mesh="link3" pos="0 0 0" quat="1 0 0 0" material="metal"/>
                        <joint name="JL3" axis="0 0 1" damping="1" limited="true" range="-1.6 1.6"/>


                        <body name="L4" pos="0.074 0.2028 0" quat = "0 0 0.707 0.707">
                            <inertial mass="0.51252" pos="0.00004 -0.00332 0.02506" diaginertia="0.00150877540 0.00146713146 0.00027678709"/>
                            <geom type="mesh" mesh="link4" pos="0 0 0" quat="1 0 0 0" material="metal"/>
                            <joint name="JL4" axis="0 0 1" damping="1" limited="true" range="-3.1 3.1"/>


                            <body name="L5" pos="0 0 0" quat = "0 0 0.707 0.707">
                                <inertial mass="0.40612" pos="0.0000116 0.056271 -0.000011" diaginertia="0.0004213245 0.000262988 0.00034500204"/>
                                <geom type="mesh" mesh="link5" pos="0 0 0" quat="1 0 0 0" material="metal"/>
                                <joint name="JL5" axis="0 0 1" damping="1" limited="true" range="-1.7 1.7"/>


                                <body name="L6" pos="0 0.173 0" quat = "0 0 0.707 0.707">
                                    <inertial mass="0.266" pos="0 -0.0000357 -0.053959" diaginertia="0.000946912 0.001056493 0.000221695"/>
                                    <geom type="mesh" mesh="link6" pos="0 0 0" quat="1 0 0 0" material="metal"/>
                                    <joint name="JL6" axis="0 0 1" damping="1" limited="true" range="-3.1 3.1"/>

                                </body>
                            </body>
                        </body>
                    </body>
                </body>
            </body>
        </body>
    </worldbody>


    <actuator>
        <position name="L1" joint="JL1" kp="500" dampratio="2" ctrllimited="true" ctrlrange="-1.7 1.7" forcelimited="true" forcerange="-50 50"/>
        <position name="L2" joint="JL2" kp="500" dampratio="2" ctrllimited="true" ctrlrange="-1.7 1.7" forcelimited="true" forcerange="-50 50"/>
        <position name="L3" joint="JL3" kp="500" dampratio="2" ctrllimited="true" ctrlrange="-1.6 1.6" forcelimited="true" forcerange="-50 50"/>
        <position name="L4" joint="JL4" kp="500" dampratio="2" ctrllimited="true" ctrlrange="-3.1 3.1" forcelimited="true" forcerange="-50 50"/>
        <position name="L5" joint="JL5" kp="500" dampratio="2" ctrllimited="true" ctrlrange="-1.7 1.7" forcelimited="true" forcerange="-50 50"/>
        <position name="L6" joint="JL6" kp="500" dampratio="2" ctrllimited="true" ctrlrange="-3.1 3.1" forcelimited="true" forcerange="-50 50"/>
    </actuator>

    <sensor>
        <jointpos name="JL1P" joint="JL1"  />
        <jointvel name="JL1V" joint="JL1"  />
        <jointpos name="JL2P" joint="JL2"  />
        <jointvel name="JL2V" joint="JL2"  />
        <jointpos name="JL3P" joint="JL3"  />
        <jointvel name="JL3V" joint="JL3"  />
        <jointpos name="JL4P" joint="JL4"  />
        <jointvel name="JL4V" joint="JL4"  />
        <jointpos name="JL5P" joint="JL5"  />
        <jointvel name="JL5V" joint="JL5"  />
        <jointpos name="JL6P" joint="JL6"  />
        <jointvel name="JL6V" joint="JL6"  />
    </sensor>

</mujoco>
碰撞筛选

通过位运算判断是否有碰撞,本质上根据32位bit是否有一位都是1,默认contype = conaffinity = 1
特殊驱动器(Stateful actuators)
某些如液压管、肌肉等类型的执行器,拥有一个叫"activation"的内部属性。这是一个与关节位置
注意到每个执行器拥有和其他执行器独立的动态,目前实现的激活类型有如下这些:
此处
对于生物力学研究者,如果需要参考更多与肌肉激活相关内容,可以参阅官方肌肉手册
更多关于filterexact细节也请参与官方Stateful Actuators
关键帧keyframe

可以用gui演示
相机(传感器)
geom -> camera
xml
<geom type="mesh" mesh="torsobase_336L" pos="0 0 0" quat="1 0 0 0" material="metal" />
                <site name = "imu" size="0.01" rgba="0 1 0 1" />
                <!-- 相机参数要和真实相机一样 -->
                <camera name="eye" mode= "fixed" pos="0 -0.15 0.1" quat="0.707 0.707 0 0" fovy="90" />
可通过以下方法获得相机图像
python
# GLFW初始化
glfw.init()
glfw.window_hint(glfw.VISIBLE, glfw.FALSE)
window = glfw.create_window(1920,1080, "Mujoco", None, None)
glfw.make_context_current(window)

# 初始化相机
camera = mujoco.MjvCamera() # type: ignore
camID = mujoco.mj_name2id(model, mujoco.mjtObj.mjOBJ_CAMERA, "eye")# type: ignore
camera.fixedcamid = camID# type: ignore
camera.type = mujoco.mjtCamera.mjCAMERA_FIXED # 相机类型,要和xml匹配# type: ignore
scene = mujoco.MjvScene(model, maxgeom=1000) # 需要创建一个场景# type: ignore
context = mujoco.MjrContext(model, mujoco.mjtFontScale.mjFONTSCALE_150)# type: ignore
mujoco.mjr_setBuffer(mujoco.mjtFramebuffer.mjFB_OFFSCREEN, context) # 渲染相关# type: ignore


def get_image(w,h): # w h不能大于window像素
    # 定义视口大小
    viewport = mujoco.MjrRect(0, 0, w, h)# type: ignore
    # 更新场景
    mujoco.mjv_updateScene(# type: ignore
        model, data, mujoco.MjvOption(), # type: ignore
        None, camera, mujoco.mjtCatBit.mjCAT_ALL, scene# type: ignore
    )
    # 渲染到缓冲区
    mujoco.mjr_render(viewport, scene, context)# type: ignore
    # 读取 RGB 数据(格式为 HWC, uint8)
    rgb = np.zeros((h, w, 3), dtype=np.uint8)
    mujoco.mjr_readPixels(rgb, None, viewport, context)# type: ignore
    cv_image = cv2.cvtColor(np.flipud(rgb), cv2.COLOR_RGB2BGR)
    return cv_image
3.控制
python
# 创建model和data变量,之后赋值并更新model
model = mujoco.MjModel.from_xml_path(join(dirname(__file__),'scene_full_336L.xml'))
data = mujoco.MjData(model)
data.ctrl = mitcontrol(q_real_float, v_real_float, q_ref, 0, kp, kd, tau_ref)
# data.qpos = np.zeros(14)
mujoco.mj_step(model, data)
mujoco.mj_forward(model, data)